If you’ve ever watched a cinematic product reveal or a slow-moving interview shot and wondered how they achieved that polished look, the answer often lies in one tool: the video camera slider.
It doesn’t require a full crane or a dolly track. A well-placed slider can transform a static frame into something dynamic, adding depth and intention to every shot. But the secret isn’t just owning the gear — it’s understanding how to plan the movement so that every slide serves the story.
“Every Move Has a Purpose”: A Practical Guide to Using a Video Camera Slider
Camera movement can change the way a scene feels. A slow lateral move can reveal depth. A controlled push-in can create tension. Even a simple product shot becomes more engaging when the camera moves with intention.
But good camera movement is not simply about making the camera move. It is about control, consistency, and timing.
For filmmakers, content creators, and commercial shooters, a video camera slider can be one of the most practical tools for achieving repeatable motion without building a complicated camera rig. The key is knowing when to use it, how to set it up, and how to make the movement serve the shot.
Here are a few practical ideas to keep in mind.
What Makes a Good Slider Setup?
Start with the shot, not the equipment
Before setting up a slider, decide what the camera actually needs to do.
Do you want to reveal a product gradually? Follow a subject across the frame? Create a subtle parallax effect? Or simply add movement to an otherwise static interview?
These questions determine the direction, speed, and length of the move.
A common mistake is to place the slider first and figure out the shot afterward. It is usually more effective to frame the shot, identify the visual purpose of the movement, and then position the slider accordingly.
The movement should have a reason to exist.
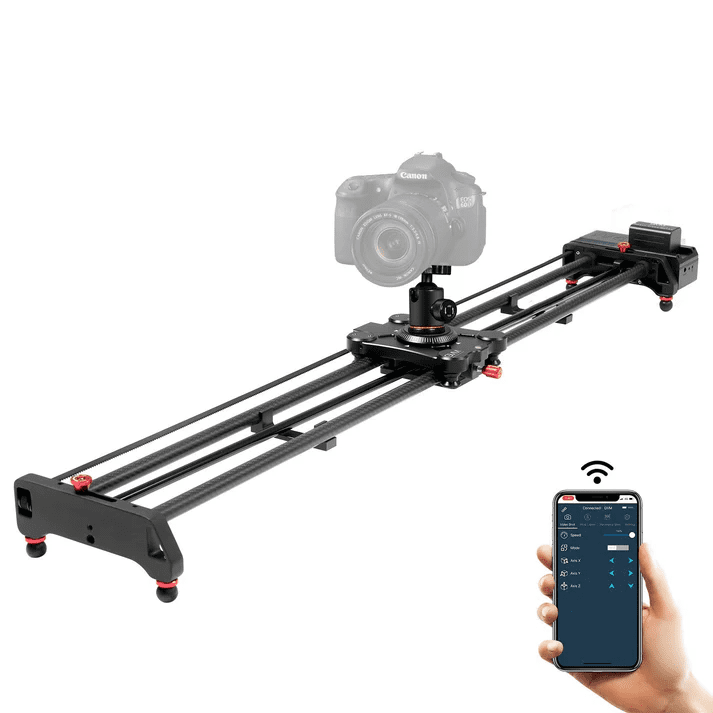
Longer rails give you more room to work
A longer slider provides more travel for camera movement, which can be useful when shooting products, food, interiors, interviews, and cinematic B-roll.
How to Plan a Slider Shot?
Find the strongest composition
Start by looking through the camera.
Check the foreground, subject, and background. Look for elements that can create depth as the camera moves. A foreground object close to the lens can make even a small slider movement feel more pronounced.
For product photography, this might mean placing the product slightly off-center and allowing the background to shift behind it.
For interviews, a subtle lateral move can introduce depth without distracting from the subject.
The best slider shots often look simple. Much of the work happens before the camera starts moving.
Decide where the movement begins and ends
Once the composition is set, define the starting and ending points.
An A-to-B movement is useful because it gives you a repeatable path. If you need to shoot the same sequence several times, the camera can return to the same positions rather than relying on manual movement.
This becomes particularly valuable when the camera movement needs to match lighting, talent movement, or a specific editing rhythm.
Keep the speed consistent
Speed is one of the easiest ways to make a slider shot feel either intentional or improvised.
Fast movement can add energy, while slower movement usually works better for product details, interviews, landscapes, and cinematic B-roll.
For automated shots, the movement can be programmed in advance. That removes some of the variation that naturally occurs when a slider is pushed by hand.
The camera does not need to move quickly.
It needs to move predictably.
Three Practical Ways to Use a Video Camera Slider
Example 1: Product and food shots
Product videos often benefit from controlled lateral movement.
Place the camera slightly to one side of the subject and let the slider create a gradual change in perspective. With the right foreground and background elements, the movement adds depth without requiring complicated camera work.
The GVM Slider-120 is designed for smooth horizontal movement and adjustable positioning, making this type of product and food photography a natural application.
A useful approach is to keep the movement slow and let the product remain the visual anchor.
Example 2: Interviews and B-roll
Static interviews can sometimes feel visually flat, particularly when the surrounding environment has interesting details.
A subtle slider move can introduce movement while keeping the subject relatively stable in the frame. It can also reveal more of the location as the camera travels.
For B-roll, the same technique can be used to move past equipment, people, architectural details, or objects in the environment.
The important part is restraint. A slider should add visual information, not compete with the subject.
Example 3: Time-lapse and panoramic shots
A motorized slider becomes even more useful when the camera needs to repeat a movement over a longer period.
For time-lapse photography, the camera and slider must work together with consistent timing. The Slider-120 can automatically execute programmed movements and calculate movement intervals for time-lapse shooting through its app.
The system also supports 120° panoramic movement. This can be useful when a wider view is needed, particularly for landscapes, interiors, and establishing shots.
These are situations where manual operation becomes difficult. Once the movement is programmed, the camera can simply be left to complete the sequence.
Why Wireless Control Matters?
A motorized slider becomes much more practical when you do not need to stand beside it.
The GVM Slider-120 can be controlled wirelessly through the GVM app on iOS and Android. Users can set movement parameters, define key points, and control automated sequences from a smartphone.
That matters on a real set.
When the camera is already framed, the talent is ready, and the lighting has been adjusted, walking back to the slider for every small change wastes time. Wireless control lets the operator stay near the camera or monitor while making adjustments remotely.
It is a small change in workflow, but one that can make automated camera movement much easier to manage.
| Feature | GVM Slider-120 |
| Best For | Film & Video · Interviews · Product Photography |
| Slider Length | 48″ / 120 cm |
| Travel Distance | 47″ / 119.4 cm |
| Load Capacity | 11 lbs / 5 kg (Horizontal) |
| Material | Carbon Fiber |
| Control Type | Bluetooth · Mobile APP |
| Shooting Modes | Horizontal · Follow Focus · 90° Panorama |
| Motion Control | A-B Point · Auto Shuttle · Auto Stop |
| Time-Lapse | Programmable Time-Lapse Shooting |
| Power Source | Rechargeable Lithium Battery |
| Portability | Lightweight Carbon Fiber Design |
In Conclusion: Let the Movement Tell the Story
A slider is not useful simply because it moves the camera.
Its real value comes from making camera movement repeatable, controlled, and intentional.
Start with the composition. Decide what the movement adds. Set the beginning and end points, then choose a speed that supports the scene rather than distracting from it.
For creators who need longer camera travel without carrying an overly complicated system, the GVM Slider-120 combines a 120 cm track with lightweight carbon-fiber construction, automated movement, wireless app control, 120° panoramic shooting, and time-lapse functionality.
The best camera movement is often the movement you barely notice.
You simply feel that the frame has come alive.
At its core, a video camera slider is only as powerful as the thought behind its use. Whether you’re capturing a subtle product detail or building atmosphere in an interview, the goal remains the same: make the movement invisible, yet essential. When the slider stops, the viewer shouldn’t think about the hardware — they should simply feel that the scene came to life. That’s the difference between moving a camera and telling a story.